译者的话
一年前我曾经翻译过同一作者的两篇关于unity中像素精灵设置的文章,这几天赋闲在家,发现这个系列出了第三篇文章,决定继续翻译。
本篇为该系列的第三部分,前两部分见译者之前的文章
为了方便中英对照,我将按照一句英文,一句中文的格式排版,删掉了一些和正文无关的内容。
因为本人英语也就是刚好过六级的水平,肯定有翻译不到位的地方,望大家海涵。
本文会同步发表在本人的b站专栏里,欢迎随便转载,但是需要署名译者。
如侵犯到原作者利益,会立刻删掉。
原作者:Alex Belzer
原文地址:https://gamasutra.com/blogs/AlexBelzer/20180504/317472/Working_with_Pixel_Art_Sprites_in_Unity_The_Camera.php
第三部分 深入探究2D摄影机

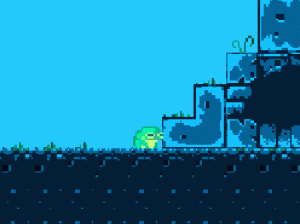
I wish this gif was just a manufactured exaggeration. It’s not.
我多希望这张gif上的问题只是我的夸张,然而并没有。
Unity, being a 3D-first engine, presupposes that you are making a 3D game, or at best a 2D game with a 3D camera.
unity,作为一个更适合开发3d游戏的引擎,会预先考虑到你在制作3D游戏或是使用3D摄影机开发游戏时的情景。
Which is why for retro pixel-art games, you need to manually set the Projection of the camera to “Orthographic” (more on orthographic projection here).Now all elements of the z-axis will be drawn “flat”, as if they are all at the same depth.
因此,当遇到像素风游戏的情况时,你需要手动设置工程内的摄影机模式为正交投影(Orthographic)模式。现在,所有Z轴上的元素都会被压平,就好像它们处在同一个深度的平面上一样。
Whether or not you’re making a tile-based game (classic Nintendo game worlds were made out of “tiles”, more on that here), this is a good time to decide the Pixels to Units ratio.
无论你是不是正在制作一个基于图块的游戏(经典的任天堂游戏都是由图块制作的),现在是一个适宜决定像素单位比率的时机。
However if you are making a tile-based game, then you want the tile size and Pixels to Units ratio to be one and the same. (Actually, if you’ve been following along in this series, you should have already decided that when importing the pixel art).
然而,如果你刚好就是在图块的基础上制作游戏,那你会想要图块的尺寸和像素的单位比率都保持在统一且相同的数值(事实上,如果你看了我写的这个系列的文章,相信你早在导入图片素材时就已经做了这一步工作)。
The pixel-size of our tiles is a number that’s going to be super important for understanding how to adjust the camera so you don’t end up with glitchy pixel weirdness (professional game dev term) like the above gif.
假如你想要理解摄像机是如何调试的,那么我们图块的像素尺寸将是一个非常重要的数值,你不能让像素最后出现上文的gif中那样怪异的闪烁(专业游戏开发术语)。
My example world is made out of tiles of 16×16 pixels, and so is our frog character.
在我使用的例子中,我们的青蛙角色和演示用的世界,都是基于16X16的像素图块绘制的。
The first way tile-size comes into play is in setting the orthographic size.
A simple formula for calculating it is cameraSizeInPixels / ( 2 * tileSize).
But in order for the camera to not cause glitchy weirdness, the following rule must be strictly obeyed:
调整图块尺寸的第一步,就是设置正交投影的size值。
计算的公式很简单:摄像机的像素尺寸/(2*图块的尺寸)。不过,为了让摄像机不会出现奇怪的问题,下面的规则请严格遵循:
the resolution of the display window and the resolution of the camera must both be divisible by the Pixels to Units ratio.
display视窗的resolution和摄像机的resolution必须都是可以被Units ratio整除的数值。
What this means is that if you are trying to have a classic Super Nintendo camera size of 256×224, but want it to play on a modern 16:9 screen (let’s say 1920×1080 pixels), you are going to have glitchy pixels, even if you change the width to accommodate the 16:9 ratio.
这就意味着如果你试图制作一个古早的超级任天堂摄影机,大小是256X224,但又指望它能在现代的16:9的屏幕(也就是通常说的1920X1080像素)上显示,那你只会得到一个有故障的像素,即使你已经改了宽度去适应16:9的比率。
In fact, 16 just isn’t a factor of 1080. But, if you set your Unity camera size to 256×144 (perfectly divisible by 16), you will end up with a good result if you display it at 1280×720 (divisible by 256×144, and 16).
16很显然不是1080的因数,但如果你把摄像机的尺寸设置为256X144(可以完美被16整除的数值),那么,你将会得到一个效果不错的1280X720的显示(这个数值刚好既能被256X144整除,又能被16整除)。
Now if you want to display at 1920×1080 using 16×16 tiles there are some clever solutions for handling this, and even some drag and drop solutions on the Unity Asset Store, so no need to abandon hope, but that’s a bit outside the scope of this article.
现在,如果你想要16×16的图块显示在1920X1080的像素上,这里有一些巧妙的解决方案,甚至unity素材商城中就有一些下载了就能用的方案,所以不必绝望,但仍然需要多说一点题外话。
If you do plan on choosing tile-sizes that will scale naturally to hi-res displays, you might find RetroPixelCameraController useful.
如果你正在计划挑选最适合的能高清显示的图块尺寸,那么复古像素摄影机控制器对你来说肯定有用。
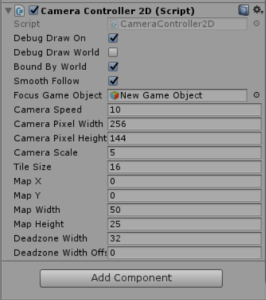
I’ve gone ahead and uploaded it on Github. Just drag and drop it onto the same Game Object with your Camera, and fill in the rest of the parameters.
我已经将这个项目放到github上了。只要下载下来,放到与你的摄影机相同的游戏物体上,再填好剩下的参数就可以了。

It’ll calculate things like the orthographic size, and change a lot of the camera settings for you. You just need to drag the Focus Game Object (usually whatever game object the player character is attached to).
这个脚本可以计算一些东西,比如正交投影尺寸,也可以为你改变一些摄影机的设置。你仅需要做的事情是拖拽需要聚焦的游戏物体(通常是与玩家角色有关的游戏物体)。
Additionally, like in the previous example if you have a camera of 256×144 dimensions, but want to output to a display resolution of 1280×720, you would set Camera Scale as 5.
此外,在之前的例子中,如果你只有一个256X144大小的摄像机,但是想要它以1280X720的高清方案输出,你就可以把摄像机的大小设置成5.
Speaking of the display resolution, here’s one of those Unity “gotchyas”: it’s important to note that the display window in the Unity game editor window is not the display window size when you properly build and run the game.
既然说到了显示方案的话题,不得不提unity中的一个“陷阱”:这非常重要且需要去注意,那就是unity游戏编辑器视窗的显示窗口和你最终生成和运行的游戏窗口是不一样大小的。
While this script will set the build display resolution correctly, it won’t change the game preview window aspect.
即使在脚本中设置了正确的需要生成的显示方案数值,也不会改变游戏预览窗口。
In other words, you’ll have to manually set the aspect when testing the game in the Unity editor itself, which is easy enough. I recommend just setting it to your camera dimension for testing.
换句话说,当在unity编辑器它自己中测试游戏的时候,你只能进行手动设置,这还算容易。我的建议是,只在需要测试的时候设置摄像机的大小。
奖励环节:摄影机死角区域(Camera Deadzones)
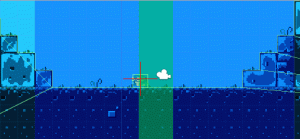
One of the cool things about this script is it let’s you define a “deadzone” in which, while moving the camera’s focus object inside of it, the camera will not choose a new focus destination. If you go into Scene view (and make sure the Debug Draw On boolean is checked), you should see something like this:
关于这个脚本,一件很酷炫的事情是,它可以让你定义一个“死角区域”,在这个区域中,当移动中的摄影机聚焦其中的某个物体时,它便无法选择一个新的聚焦方向了。如果你进入场景预览页面(还要确保debug的布尔值框是选中状态),你将会看到类似这样的画面:

You’ll see the red cross-hairs (the camera’s focus destination) flip sides when the focus object (the frog) reaches the other side of the deadzone (the green area). Oh, and the blue area represents the camera’s size.
可以看到,当被聚焦的物体(青蛙)达到了死角区域的(绿色区域)的另一边时,红十字准星(摄影机聚焦的方向)会跟着来回移动到另一侧。蓝色的区域表示的是摄影机视野的大小。
One other things the script handles is smooth motion. Combines with the horizontal deadzone, the lack of one-to-one motion should make things feel a bit nicer. Feel free to play around with the deadzone parameters in real-time until you arrive at something you like.
此外,该脚本还可以处理平滑移动。结合了水平方向上的死亡区域,缺乏一对一的动画应该产生更好的效果。可以自由、即时地设置死亡区域的参数,直到达到了你满意的效果为止。
One last tip: the camera speed should be at least as fast as the player character, if you want the camera to keep up with the player’s movement and not lag behind (unless that’s your intention).
最后一个小贴士:如果你想要摄影机跟随玩家移动而不落后(除非是你故意这样设计的),摄影机的速度应该至少和玩家移动的速度一样快。
But too fast of a camera speed and it will sharply jump across the deadzone when the focus object switches sides. With some tweaks you should end up with something you’re happy with it.
但是当摄影机移动的速度过快,且被聚焦的物体在两侧移动的时候,会导致死亡区域被极快地跳过去。需要作出一些调整,这样你最终才会得到满意的效果。

One last thing: you can just as easily add this component in script. Simply use the SetCamera method after you use AddComponent and you should be honky-dory.
最后:你可以尽量简单地在脚本里添加这个组件。添加之后简单地调用SetCamera方法,这样就大功告成了。

And that about wraps this up. Thanks for reading, and feel free to use RetroPixelCameraController in your Unity project.
以上包含了本篇文章的内容。感谢您的阅读,自由地在你的unity中使用复古像素摄影机控制器吧!
In the next episode in this series I’ll finally go over my alternate solution for Unity 2D collisions and player movement, so stay tuned!
在本系列文章的下一篇中,我将解决unity2D碰撞体的可选方法问题和玩家的移动,大家敬请期待吧!(译者我也很期待呀~)